Arduino Due VGA Output
One of the first things that excited me about the Arduino Due was the possibility of VGA output with nothing more than a few resistors, a VGA connector and a bundle of wires. Arduino Forum member Stimmer has produced a brilliantly fast and low level VGA library that gives 8-bit colour at 320x240 pixels. Plenty of output for basic games, graphics demos and other visual tinkering. You can get this library here: https://stimmer.github.io/DueVGA/
Getting Connected
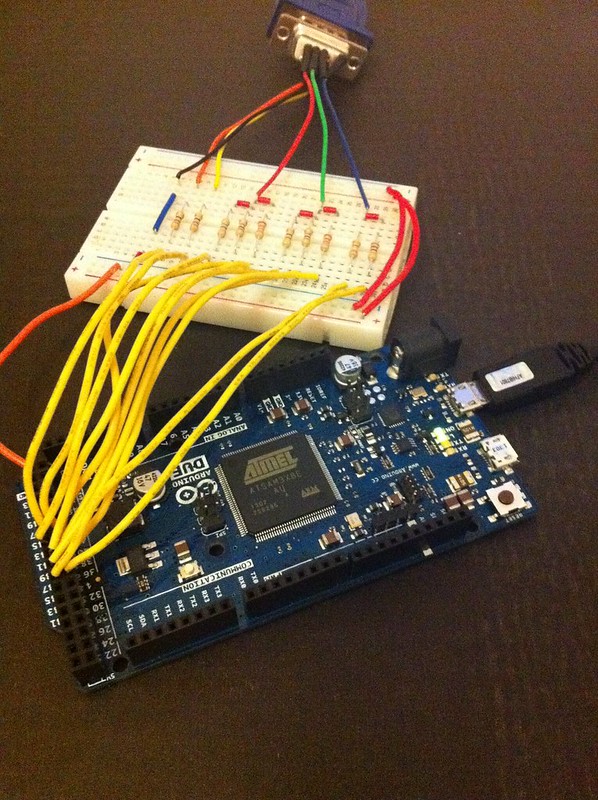
VGA is fairly simple in the hardware department, requiring an array of 10 resistors which form two pairs of 3 ( 3 bits red, and 3 bits green ) and one pair of two ( 2 bits blue ) plus two for the horizontal and vertical sync signals. I found that the hardest part of building out an adaptor was finding the right resistor values, but a little trial and error on a breadboard and a seeming inability to discern between red and orange finally lead me to a working prototype.

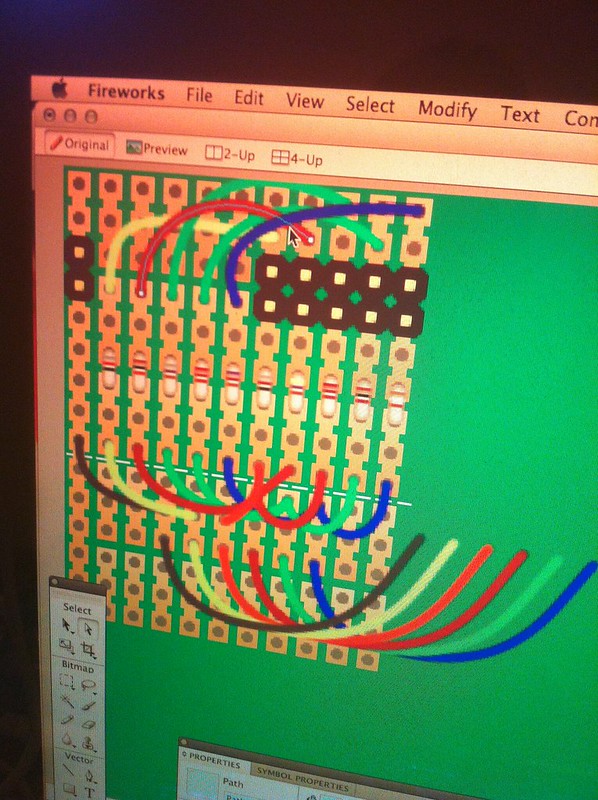
The next step was translating that prototype to perfboard. I used a small piece of 3-hole breadboard from Clas Ohlson. I used Fireworks to manually sketch out my design beforehand and compress it down to a cozy 11 tracks wide.
10 of these tracks were broken into sets of 3 holes, and the 11th was continuous and used to join the ground on the Arduino Due to the ground on the VGA connector.

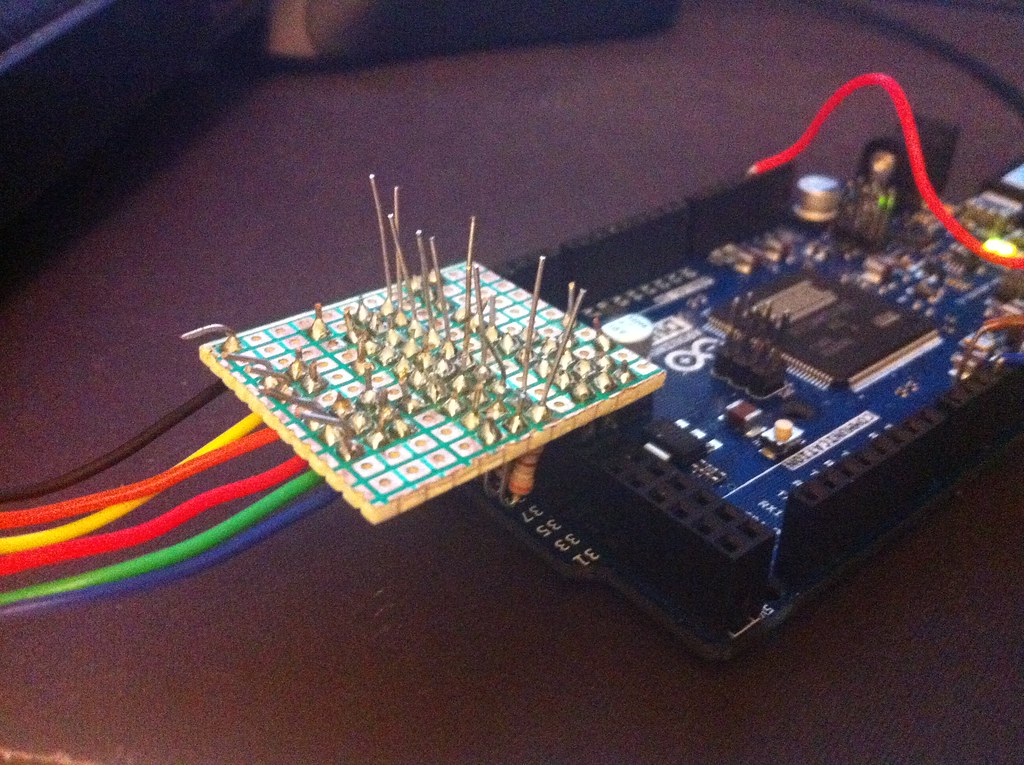
I stood the resistors upright to save room, and managed to pack them into a perfect row of 10 with some spaghetti wiring joining them together. The downside of this design is that it overlaps a number of unused inputs on the Arduino Due. Fortunately I was able to tuck the wires for my MegaDrive controller port underneath my PCB and make use of these otherwise lost and forgotten inputs, so everything ended up very neat and tidy.
Once set up and running, and after remembering to trim the leads off the resistors so they didn't intefere with each other, the picture was perfect. This is the first thing I've ever committed to perfboard, and I'm more than happy with the result.
Converting Bitmaps
After setting up DueVGA and assembling my adaptor, the next step was to do something interesting with my new-found VGA-output functionality. Many DueVGA users, including Stimmer, had concerned themselves with drawing fractal patterns which, although cool, didn't really interest me. I decided to ressurect some old tricks I used with Monochrome graphic LCDs on the ATMega328 and create a bitmap converter.
The 8-bit output of DueVGA uses a number between 0 and 255 to represent a colour. The first three bits of this number represent Red, the second three Green and the last two Blue. In practise the bias toward Red and Green doesn't result in poor image reproduction, but having only a handful of possible blue values is an odd concept to grasp.
My challenge was to map these 256 colours to their equivilent RGB/HEX colour codes and produce a palette file which allowed PNGs to be exported from Fireworks into a format suitable for crunching down for the Due.
To do this I started with the 256 colour pallete from Wikipedia: https://en.wikipedia.org/wiki/File:256colour.png. This gave me a list of all possible colour values which the DueVGA could theoretically produce. Some amount of muddling was required to figure out which colour on this palette corresponded to which colour index on DueVGA. If you look at my Due VGA Colour Table you'll see why. Rather than the colours running sequentially from left to right and looping underneath, the palette was separated into blocks of 32 colours with the value of Blue running from left to right and the value of Green running from top to bottom. Each block of 32 colours represented an increase in the value of Red- so this resulted in 8 (Red) blocks of 4 (Blue) by 8 (Green) colour.
To avoid tripping over colours in future, I used a Ruby script to produce my Due VGA Colour Table. This shows the 8-bit hex notation for each colour from 0x00 to 0xFF and makes it easy to pluck a colour out if you need to use it directly in your code. On mouseover, it also shows the binary value and the 24-bit hex colour you're probably more likely to recognise from desktop graphics applications. If you're putting together some bitmap graphics for your DueVGA project then you can use these colours in your graphics package of choice.
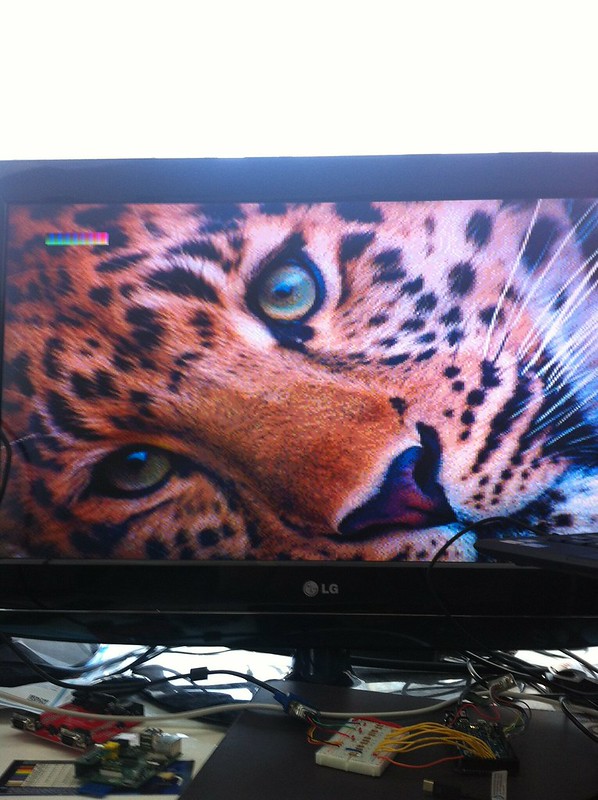
Alternatively, if your graphics package supports .act colour palettes then you can load up this 8bit-truecolor-palette.act file. This is excellent for compressing and dithering more complex images for display on the Arduino VGA, and I've had pretty stunning results with a range of photos.

The final step in converting a bitmap is to take your exported, palettized PNG file and, with the help of Ruby and the Chunky PNG ( which is free from the dependency hell of Image Magick ), crunch it into a "static unsigned char" array of 8-bit colour values. For this you can use Convert.rb from my Arduino DueVGA Tools repo on GitHub.
Indexed Palettes And Byte Packing
If you're not using the full 256 colour palette for your image, I've also added index-palette support into Convert.rb which will give you a palette of 15 colours with the 16th reserved for transparency. This allows twice as many pixels to be packed into the same number of bytes, halving the size of your data. If you can get to grips with Convert.rb you'll also find it stores 3 bytes of metadata in each image containing the Width, Height and Frame Count. I use these values in my code to animate 16-colour sprites and by not hard-coding these values I can use a generic function for various different sizes of sprite. See DueVGABitmap.ino for an example of this in action!
Getting Technical
Another little trinket in my DueVGA Tools library is my HSV ( Hue, Saturation, Value ) colour to 8-bit colour convertion function. Stimmer may implement this directly in the DueVGA library. It provides a very clean and simple way of transitioning between colours ( by just incrementing the Hue value ) and is a mostly integer-implemented spin on the standard HSV-to-RGB functions you may have encountered before in Arduino LED lighting projects.
Where the DueVGA HSV to RGB differs is in the weighting of the final colour values and their packing into a single byte representing a colour that DueVGA can display.
« Back to index Posted on 2013-09-02 by Philip Howard